Transient Finder Mode
Find sources that change between your frames.
Open a folder of repeated images of one field, and CAst solves them, measures every point source on every frame, and lists the fixed positions whose brightness changed.
What a transient is
Sources that appear, fade, or flare.
A transient is a source whose brightness changes over hours, days, or weeks: a supernova in a distant galaxy, a nova, a flaring star, or a dwarf nova in outburst. Astronomers find them by comparing images of the same field taken at different times.
Your repeated images of a field are that comparison.
Review
Blink every candidate.
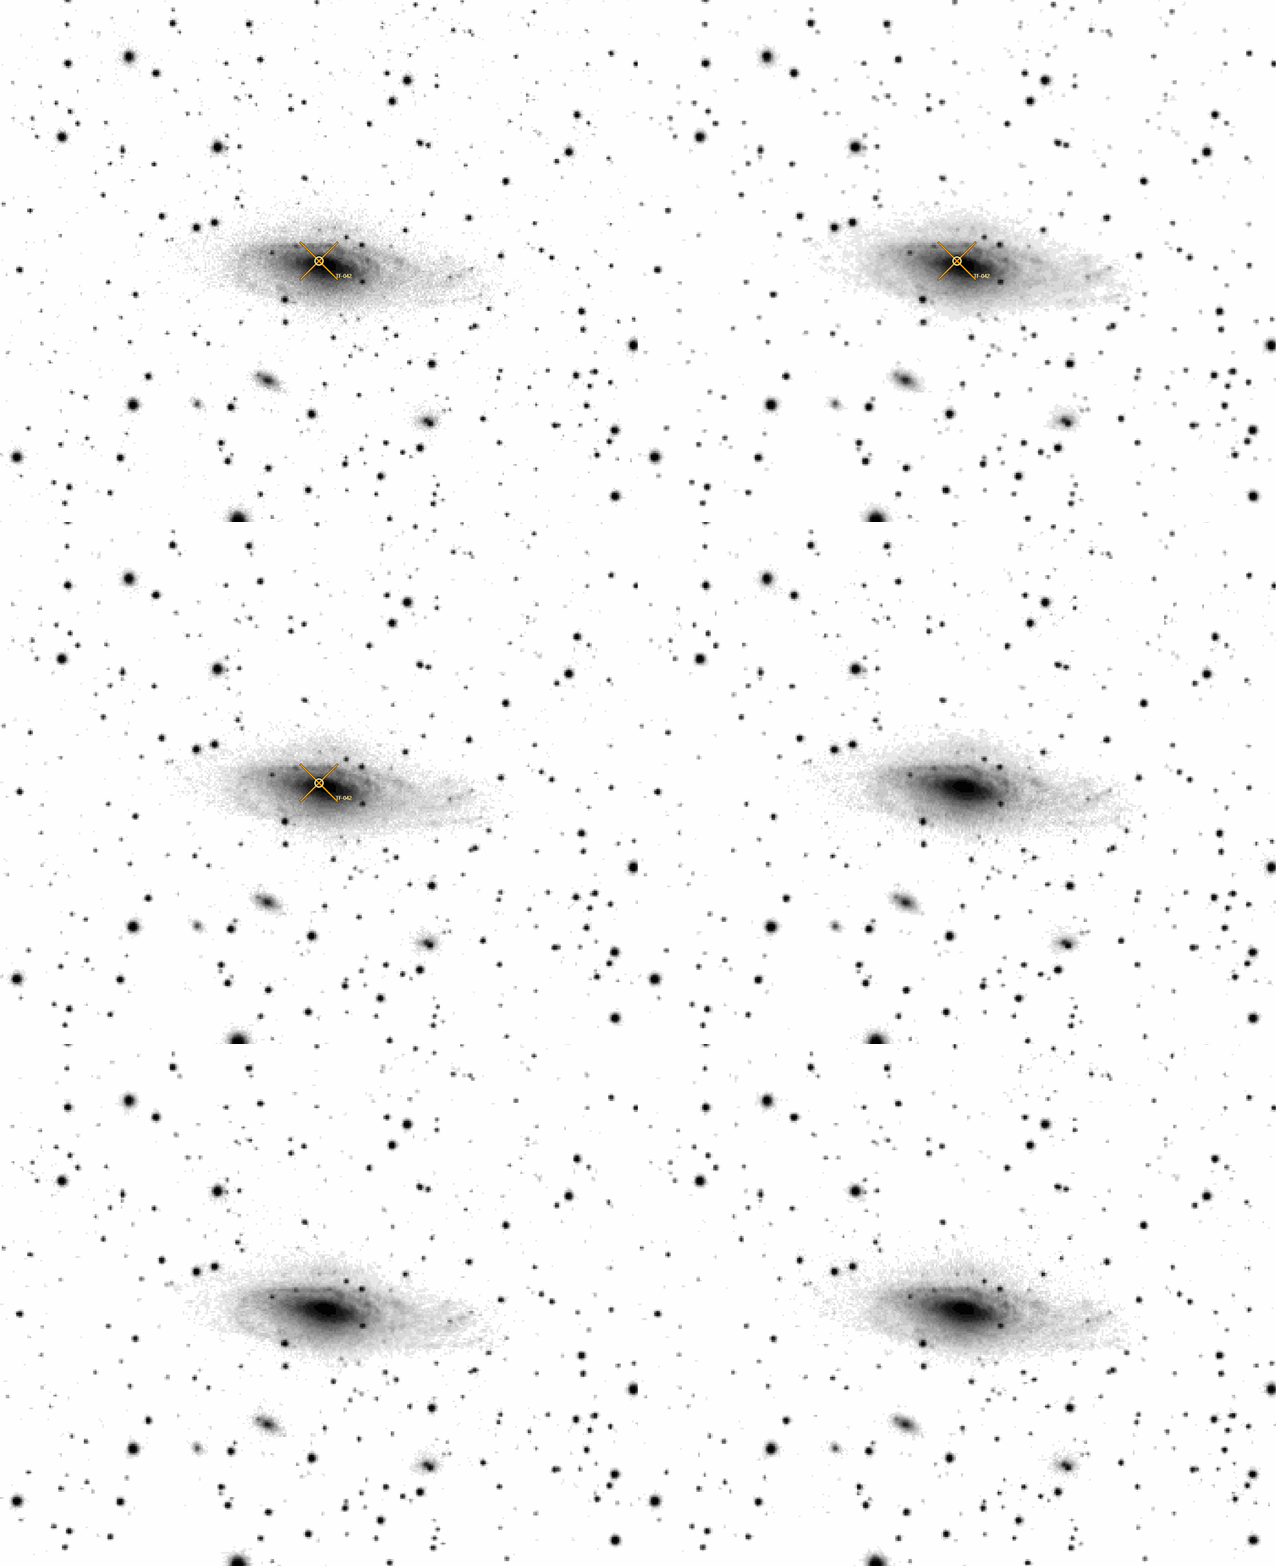
Transient Finder measures every point source on every frame and lists the fixed positions whose brightness changed. Select a candidate to center it, then blink the frames to see the change yourself.
A candidate is a place to look, not a discovery. Check it against Gaia and Sky Explorer before you report it.
Complete tutorial
From a folder of frames to checked candidates.
The step-by-step part follows the order you work in: open, search, review, check, export. Settings, column definitions, and how candidates are scored are in the Reference part after it.
What this mode does
Transient Finder looks for things that stay in one place on the sky but change brightness: a star that flares, a source that appears where nothing was before, or one that fades away. You give it several images of the same field taken at different times. It finds point sources in each frame, groups detections that share a sky position, measures each position on every frame, and keeps the positions whose brightness changed more than static stars and seeing would explain.
It does not look for moving objects. For asteroids and comets, use Asteroid/Comet Detection.
- Search a sequence. Open a folder of repeated frames and search them in one run. Step 04
- Solve missing WCS. Frames without a usable plate solution are solved automatically and cached. R4
- Compare against one Gaia catalog. One Gaia DR3 query (G ≤ 18) covers the whole sequence and gives each candidate its nearest catalogued star. R4
- Read a ranked candidate list. Candidates are numbered by how strongly they varied, with a report in the Work Log. Step 06
- Inspect each candidate. See per-frame detections, variability, and flux ratio, with crosshairs on the image. Step 07
- Blink it. Cycle through every frame at the candidate's position to judge it by eye. Step 08
- Check it. A short checklist for deciding what a candidate is before you trust it. Step 09
- Export the blink. Save the blink as a GIF or MP4. Step 10
- Optional model scores. A local model can score candidates from saved training labels. R6
Before you begin
- Images
- At least two images of the same field taken at different times. FITS (
.fit,.fits), XISF, TIFF, and camera RAW files are searched. JPG and PNG files are skipped. Similar pointing, filter, and exposure give cleaner results. - Folder layout
- Put the frames directly in one folder, or in subfolders one level below it. The exact rule is in R4.
- Plate solving
- Frames with a valid embedded WCS are used as they are. Unsolved frames are solved during the search. For the most reliable solving, add an astrometry.net key in Settings > Open Settings > General > Astrometry API Key.
- Timestamps
- Observation times come from
DATE-OBS. Times without a timezone are read in Image Timestamp Timezone (Settings > Open Settings > Differential Photometry, under Science Export; default UTC). - Internet
- The Gaia query and astrometry.net need a connection. Solved frames and catalog results are cached and reused on the next search.
- Color data
- Color images, including demosaiced camera RAW, are averaged into one synthetic luminance plane. That is fine for finding changes; for precise measurements use calibrated single-channel frames.
Step by step
Search a folder and review the candidates
Follow the steps in order the first time. Leave the search settings at their defaults for a first run.
Open the mode
- On the mode picker, under SCIENCE WORKFLOWS, click Transient Finder.
- If CAst is already open in another mode, choose Mode > Transient Finder instead.
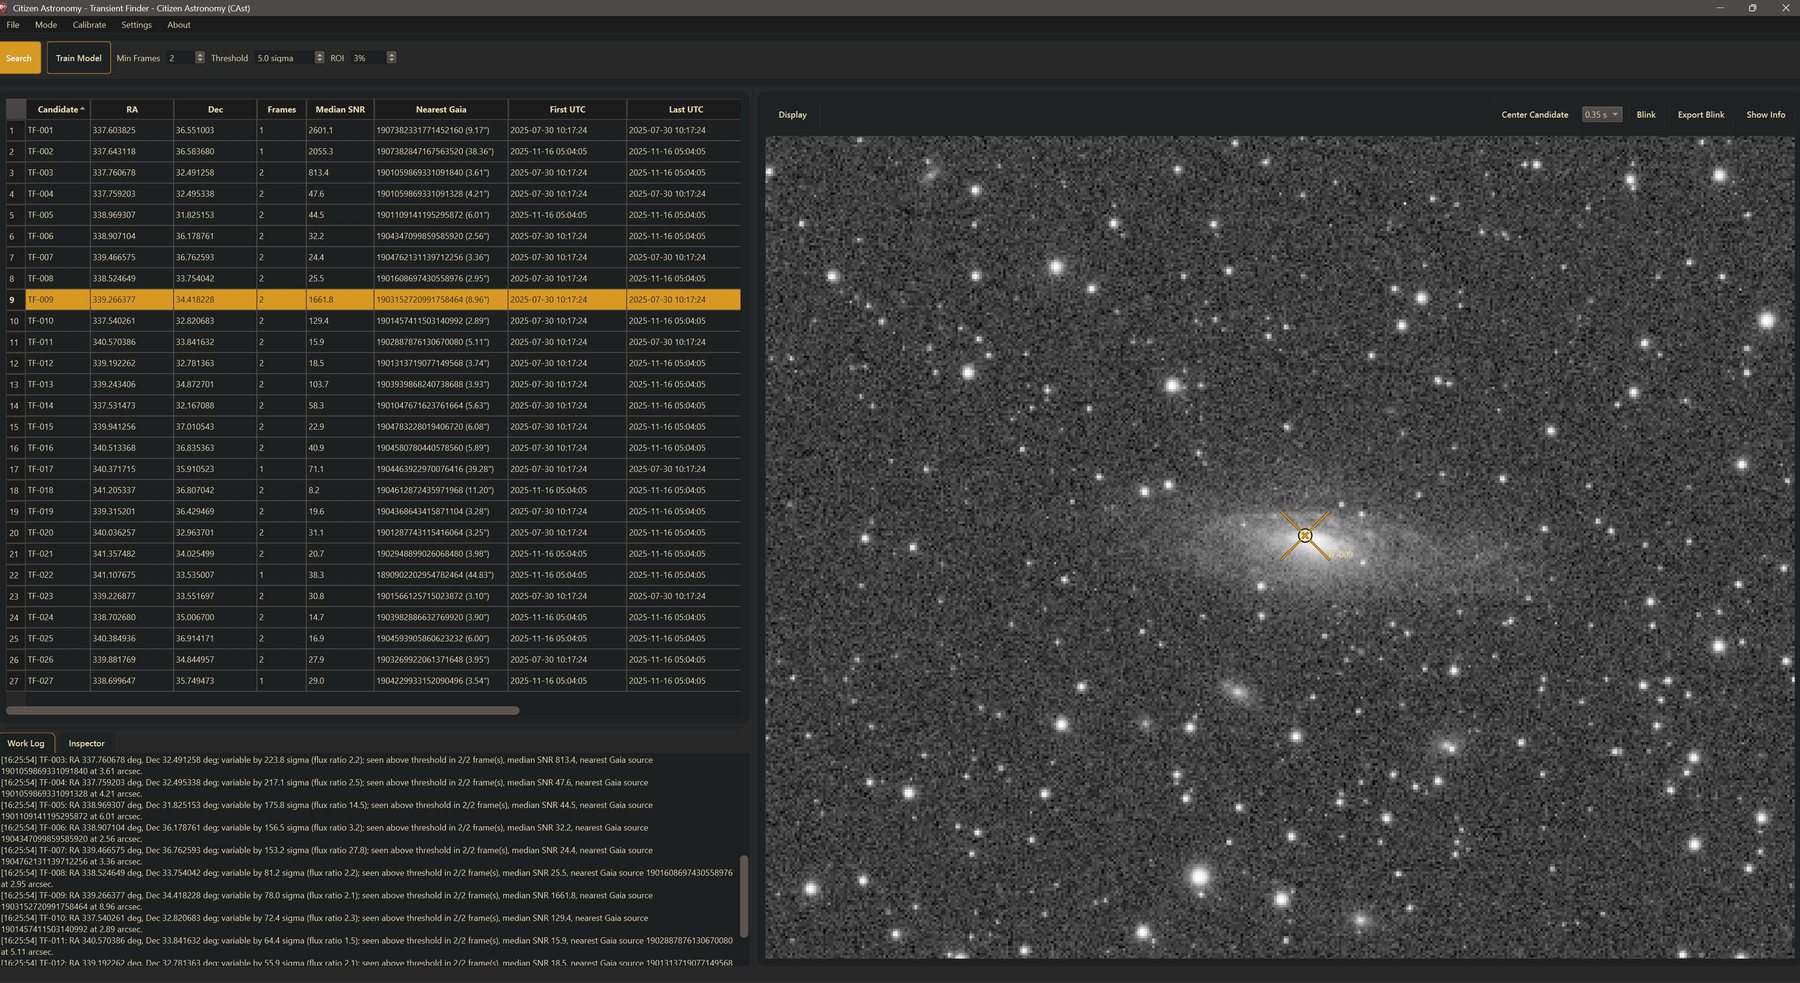
The workflow row along the top shows Open, Train Model, Min Frames, Threshold, and ROI. Below it, the candidate table is on the left with the Work Log and Inspector tabs underneath, and the image view is on the right.
Open your folder
- Click Open on the workflow row. You can also choose File > Open Folder.
- In Select transient image folder, choose the folder that holds your frames and confirm.
CAst clears any earlier results, writes Opened transient image folder: … to the Work Log, and shows the first image it finds in the image view. The Open button changes to Search. The search has not started yet.
- Ctrl + Shift + O: File > Open Folder
Once a folder is open, the workflow-row button always runs Search. To switch to a different folder, use File > Open Folder.
Run the search
- Check Min Frames (default 2), Threshold (default 5.0 sigma), and ROI (default 3%). The defaults are a good first run. What each one does is in R1.
- Click Search.
- Watch the Work Log. The button reads Searching..., the three settings are locked, and a busy bar runs under the workflow row.
The search runs in this order, and each stage writes timestamped lines to the Work Log:
- WCS check.
[WCS 3/12] Checking …for each frame. Frames without a usable WCS are solved; frames that cannot be solved are skipped. - Gaia query. One Gaia DR3 query for the combined footprint of all solved frames.
- Detection.
[Transient 3/12] Detecting point sources in …, then the number of detections kept in that frame. - Screening. Detections are grouped by sky position, every group is measured on every frame, and groups that did not change enough are rejected.
When it finishes, the report is added to the Work Log, the table fills, and the first candidate is selected. The frames load in the background so blinking starts quickly.
There is no Cancel button. Switching to another mode stops a running search and clears the results, unless Keep mode memory when switching is on in Settings > Open Settings > General.
Read the results
The report
Scroll to the end of the Work Log. The report lists:
Transient Finder scanned N image(s).Solved frames: N/M (K solved through astrometry.net).Gaia comparison sources loaded: N.Point-source detections retained before variability screening: N.Variable transient candidates retained: N.Top candidates:a summary line for up to 12 candidates.Notes:skipped frames, how many groups were rejected as static or seeing-driven, Gaia problems, and caps.
Check the solved-frame count first. If frames were skipped, the notes say why.
The candidate table
Each row is one sky position, named TF-001, TF-002, and so on. TF-001 changed the most relative to its noise. The columns are Candidate, RA, Dec, Frames, Median SNR, Nearest Gaia, First UTC, Last UTC, Label, and ML Score; their exact meaning is in R2.
- Click a column header to sort by that column. Click it again to reverse the order.
- Click a row to select that candidate.
A row is a position where the measured flux changed significantly between frames. It is not a confirmed transient. Hot pixels, satellite trails, a bad frame, an asteroid, or a known variable star can all produce a row. Step 09 explains what to check.
Review a candidate
- Click a candidate row. A crosshair marks it on the image.
- Click Center Candidate to turn it on. From now on, every candidate you select is centered in the view, at your current zoom.
- Scroll over the image to zoom in around the cursor. Drag with the left mouse button to pan.
- Click the Inspector tab to read the candidate's numbers.
The Inspector shows the summary line (for example variable by 41.2 sigma (flux ratio 3.4); seen above threshold in 3/5 frame(s)), then Detections, Max SNR, Variability SNR, Flux ratio, the nearest Gaia source, and Per-frame detections: with the file, time, pixel position, RA, Dec, and SNR for each frame where the source was detected.
Adjust the display
- Click Display above the image.
- Choose a Stretch: (Auto Stretch, Linear, Asinh, Sqrt, or Log).
- Click Curves to shape the tone curve, then click Apply.
- Tick Invert to show dark stars on a light sky. Faint changes are often easier to see this way.
- Click Reset to return to the default display.
Look at several candidates together
Ctrl-click or Shift-click rows to select several candidates. All of them are marked on the image: the current one in amber, the others in blue. The Inspector, Center Candidate, Blink, and Export Blink use the current one.
- Scroll: zoom around the cursor
- Left-drag: pan
- Ctrl + click, Shift + click: select several rows
- Ctrl + A in the table: select all candidates
Blink a candidate
- Select a candidate.
- Choose a blink interval in the list next to Blink: 0.10 s, 0.18 s, 0.35 s (default), or 0.70 s.
- Click Blink. A Preparing Blink window loads the frames, then playback starts with the candidate centered.
- Watch the crosshair. Click Blink again to stop.
The blink runs through every frame where the position could be measured, in time order, including frames where nothing was detected. That is how a source that appears or disappears becomes visible: you see the empty frames as well as the bright ones.
You can change the interval while the blink runs. Blink is greyed out for a candidate with fewer than two measurable frames.
Check what you found
A candidate has passed a numeric test. It may still be an artifact, a known object, or a bad frame. Work through these checks before you treat it as interesting.
- Blink it and look closely. A real source looks like a star where it is bright, at the crosshair. A single sharp pixel is usually a hot pixel or cosmic ray. A streak is a satellite or aircraft. A dot that shifts between frames is a moving object.
- Look at the faint frames. If the faint frame is cloudy, hazy, or out of focus, many stars get flagged together. Sort by First UTC or Last UTC and see whether a large group of candidates shares the same frames.
- Read Nearest Gaia. A Gaia star a few arcseconds away usually means the candidate is that star. It may be a known variable, or the change may come from saturation or seeing.
- Check the catalogs in Sky Explorer. Open one of the frames in Sky Explorer and run Explore with variable stars and asteroids/comets included. If a catalogued object sits at the position, the change is probably already known. Comparing the field with a Survey image shows whether the source was there before your frames.
- Check for motion. If the source drifts from frame to frame, search the same folder in Asteroid/Comet Detection.
- Measure it. If it survives these checks, measure a light curve in Differential Photometry. Transient Finder reports instrumental flux ratios and signal-to-noise ratios, not magnitudes.
Nearest Gaia uses Gaia stars down to G 18 and is the closest star at any distance, not an identification. A blank Nearest Gaia does not mean the position is uncatalogued; check it in Sky Explorer and in professional transient and variable-star catalogs before reporting anything.
Export a blink animation
- Select the candidate, and set the zoom, stretch, and blink interval you want.
- Click Hide Info if you do not want the information panel in the animation.
- Click Export Blink.
- In Export Transient Blink Animation, choose Animated GIF Files (*.gif) or MP4 Video Files (*.mp4). The default name is
TF-xxx_transient_blink.gifin the opened folder. - Click Save. An Export Blink progress window steps through the frames; click Cancel there to stop.
Each frame of the animation is the image view exactly as you see it: its size, zoom, stretch, curves, invert, crosshairs, and the information panel if shown. Each frame lasts one blink interval, and GIFs loop forever. The Work Log confirms the saved path.
The blink animation is the one file export in this mode. The Work Log text, including the report, can be selected and copied.
Reference
Controls, settings, and calculations
Look things up here after you know the workflow.
Search settings
- Min Frames
- The search needs at least this many solved frames, and a candidate must be measurable in at least this many. It does not require that many detections: a source seen in one frame can pass if enough frames could be measured at its position. The variability test always needs at least two measured frames, even at 1.
Default 2, range 1–99.
- Threshold
- Detection threshold in units of the frame's background noise. Raising it finds fewer, brighter sources and also raises the variability requirement, the “absent” limit, and the galaxy-core exception (see R5). Lowering it finds fainter sources and more false alarms.
Default 5.0 sigma, range 1.0–50.0 in steps of 0.5.
- ROI
- Border excluded from detection, as a percentage of the shorter image side. The excluded border is drawn on the image as you change the value. Even at 0%, sources within 6 px of the edge are not detected, and positions within 17 px of the edge cannot be measured.
Default 3%, range 0–45%.
- Fixed values
- Not adjustable in the panel: detection FWHM 3.0 px, grouping radius 2.5 arcsec, Gaia limit G ≤ 18.0, Gaia neighbor radius 5 arcsec, up to 25,000 detections per frame, and up to 500 candidates.
- Related settings
- In Settings > Open Settings > General: Astrometry API Key, Astrometry Timeout (default 300 s), Image Display (default stretch and invert), and Keep mode memory when switching. In Settings > Open Settings > Differential Photometry: Image Timestamp Timezone.
Table and Inspector
| Column | Meaning |
|---|---|
| Candidate | ID such as TF-001, numbered by variability SNR, highest first. |
| RA, Dec | Mean sky position of the detections, in degrees. |
| Frames | Measured frames where the aperture flux is positive and its SNR is at least Threshold. |
| Median SNR | Median detection SNR over the frames where the source was detected. |
| Nearest Gaia | Closest Gaia (G ≤ 18) source to any detection, with its separation in arcsec. - means no Gaia data was available. |
| First UTC, Last UTC | Earliest and latest observation time among the detections. |
| Label | Saved training label, or -. |
| ML Score | Predicted label and confidence from the latest local model, or -. |
Sorting by a column header is the way to reorder the table. There is no filter box and no right-click menu.
Lower tabs
- Work Log
- Timestamped progress, the search report, and blink and export messages.
- Inspector
- The selected candidate's summary,
Detections,Max SNR,Variability SNR,Flux ratio, nearest Gaia source, any label or model score, and the per-frame detection list. Frames where the source was measured but not detected are not listed. - Panel sizes
- Drag the splitters to resize the table, the tabs, and the image. If you collapse the tabs, click ▲ Work Log · Inspector to restore them. If you collapse the left side, click ▶ Candidate Transients.
Image controls
- Display
- Opens Stretch: (Auto Stretch, Linear, Asinh, Sqrt, Log), Curves, Invert, and Reset.
The defaults come from Image Display in Settings.
- Curves
- Opens the Curves dialog with a preview and histogram. Apply keeps the curve, Cancel discards it, and Reset straightens it.
- Reset
- Restores the default stretch and invert and removes curves.
- Center Candidate
- Toggle. When on, selecting a candidate centers it at the current zoom.
- Blink interval
- 0.10 s, 0.18 s, 0.35 s, or 0.70 s per frame.
Default 0.35 s. Also sets the frame duration of exported animations.
- Blink
- Toggle. Cycles through every measured frame of the current candidate in time order, keeping it centered. Needs at least two frames.
- Export Blink
- Saves the blink as GIF or MP4. Needs at least two frames.
- Hide Info / Show Info
- Hides or shows the information panel on the image, which lists the file and the selected candidate's details.
- Crosshairs
- Amber for the current candidate, blue for other selected candidates. On a frame with no detection, the crosshair is placed from the candidate's RA and Dec through that frame's WCS.
- Mouse
- Scroll to zoom around the cursor; left-drag to pan. Right-click does nothing in this mode.
Solving and catalogs
Which files are searched
The scan does not go through every subfolder. CAst uses the first of these that contains images:
- If the folder has a
Filessubfolder: the images inside each subfolder ofFiles. - Otherwise: the images inside each direct subfolder of the opened folder.
- Otherwise: the images directly in the opened folder.
If the folder has loose images and also subfolders with images, the loose images are not searched. All searched images form one sequence, sorted by DATE-OBS and then file name.
Plate solving
Each frame's embedded WCS is checked first. If it is missing or unusable, two solvers start together and the first success is used:
Local Gaia matching
Runs when the header has center RA/Dec, focal length, pixel size, and image size. Matches the frame's stars to Gaia DR3 around the header pointing. No API key needed.
astrometry.net
Runs when Astrometry API Key is set. Works without header pointing. Astrometry Timeout limits the wait (default 300 s, range 30–3600 s).
Solved frames are saved in the cache directory under transient-wcs and reused. A frame that cannot be solved is skipped with a note in the report. File > Clear All Cache… deletes all cached solutions and catalogs, keeping your settings.
The shared Gaia catalog
After solving, CAst builds one footprint that covers every solved frame and makes one Gaia DR3 query down to G 18.0, in tiles when the field is wide. It is cached under catalogs. The report line Gaia comparison sources loaded gives the count. This catalog supplies each candidate's Nearest Gaia and the rejection of ordinary stars described in R5. If the query fails, the search continues without it and the notes say Gaia lookup unavailable for this field.
How variability is scored
Detection
Each solved frame is reduced to one plane, its background median and noise σ are estimated with sigma clipping, and a star finder (FWHM 3.0 px) detects sources above Threshold × σ. Sources inside the edge margin (the larger of 6 px and the ROI) are dropped. Detection SNR is peak / σ.
Grouping
Detections from all frames that lie within 2.5 arcsec of each other are linked into one group; each frame contributes at most one detection per group. The group's position is the mean of its detections.
Measuring every frame
Each group's position is projected into every solved frame and measured with an aperture of 5.25 px radius and a background annulus from 9.0 to 14.25 px. Flux F is the aperture sum minus the annulus background, its uncertainty is σ_local × √N_aperture, and aperture SNR is F / σ_F. Frames where the position is within 17 px of an edge are not measured.
The variability test
CAst compares the measured frame with the highest flux (bright) and the one with the lowest (faint):
variability SNR = (F_bright − F_faint) / √(σ_bright² + σ_faint²)flux ratio = (F_bright + floor) / max(F_faint, floor), wherefloor = max(σ_bright, σ_faint, 1)
A group becomes a candidate when all of these hold:
- At least two frames, and at least Min Frames, were measured.
- The bright frame has positive flux with aperture SNR at least Threshold.
- Variability SNR is at least the larger of 7.0 and 1.25 × Threshold (8.75 at the default).
- And one of: the flux ratio is at least 2.0; the faint frame is absent (flux ≤ 0 or aperture SNR ≤ the larger of 2 and 0.55 × Threshold); or the galaxy-core exception applies (variability SNR at least the larger of 28 and 5 × Threshold, flux ratio at least 1.35, and the highest peak SNR at least 1.45 times the lowest).
The galaxy-core exception lets a strong brightening on a bright galaxy nucleus pass even when the total flux in the aperture changes by less than a factor of two.
Gaia neighbor rejection
If a Gaia star (G ≤ 18) lies within 5 arcsec of any of the group's detections and the flux ratio is below 2.0, the group is rejected. This removes ordinary stars that flicker with seeing. It applies even when the absent or galaxy-core test passed, so a real event next to a Gaia star needs a flux ratio of 2.0 or more. The report counts every rejected group as static or seeing-driven.
Ranking
Candidates are sorted by variability SNR, then flux ratio, then maximum detection SNR, and numbered in that order. At most 500 are kept.
Each frame is measured on its own; there is no image subtraction. A frame with different seeing, focus, or transparency can make static sources look variable, and a high variability SNR does not by itself mean a real astrophysical change.
Labels and model scores
Transient Finder can score candidates with a local Random Forest model trained on candidates you have labeled before. Labels are Real, Artifact, Known Object, Moving Object, Noise, and Unsure. Labels and models are stored on your computer in candidate-training.sqlite3.
- Train Model
- Trains a new model from all saved transient labels and re-scores the table. The result appears in the Work Log.
Needs at least two labeled candidates with two different labels. With six or more labels and at least two per label, a held-out validation runs as well.
- Label column
- The label saved for this candidate, or
-. - ML Score column
- The latest model's predicted label and its confidence, or
-when no model exists.
In the current version, the controls for saving labels are not shown in the Transient Finder panel. Unless labels already exist, Train Model reports Label at least two candidates before training. and the Label and ML Score columns show -. A model score is a hint, not a classification.
Troubleshooting
The search says it needs more solved frames
The report says Transient search needs at least N solved frame(s) when fewer frames were solved than Min Frames. Read the Skipped … notes for the reason. Set an Astrometry API Key in Settings > Open Settings > General, or make sure the headers carry center RA/Dec, focal length, and pixel size for local Gaia matching.
Some of my images were not searched
JPG and PNG files are skipped. Images two folder levels deep are not searched, and loose images are ignored when the folder also has subfolders with images. See R4 and move the frames into one folder.
The report says no candidates were found
No variable point-source candidates were found across the solved frame sequence. means nothing changed enough to pass the test in R5. Try a lower Threshold (for example 4.0) and a smaller ROI. If the expected source sits next to a Gaia star, it needs a flux ratio of at least 2.0 to pass.
Dozens of ordinary stars are flagged
One frame is probably much worse than the others: clouds, haze, poor focus, or trailing. Sort by First UTC or Last UTC to find the shared frame, remove it from the folder, and search again. Raising Threshold also helps.
Blink and Export Blink are greyed out
Select a candidate first. A candidate measurable in fewer than two frames cannot be blinked.
Nearest Gaia shows a dash for every candidate
The Gaia query failed, usually because there was no connection. The report notes say Gaia lookup unavailable for this field. Without Gaia, the neighbor rejection does not run, so expect more candidates on ordinary stars. Reconnect and search again.
My results disappeared after switching modes
Leaving the mode clears its results to free memory. Turn on Keep mode memory when switching in Settings > Open Settings > General to keep them. A search that is still running is also stopped when you switch.
Train Model says to label candidates first
Training needs saved labels, and the labeling controls are not shown in the current panel. See R6. The search and review work without a model.
The exported animation is small or includes the info panel
Export Blink captures the image view as it appears on screen. Enlarge the window or the image panel, zoom as you want, and click Hide Info before exporting.
A frame was solved wrongly, or I want to solve again
Solved frames are cached under transient-wcs. File > Clear All Cache… removes all cached solutions and catalogs; the next search solves every unsolved frame again.