Asteroid / Comet Detection Mode
Find the asteroids and comets in your frames.
Open a folder of subframes, and CAst lists the catalogued asteroids and comets in your field, shows which ones your pixels recover, and searches the rest of the frame for moving objects it cannot match.
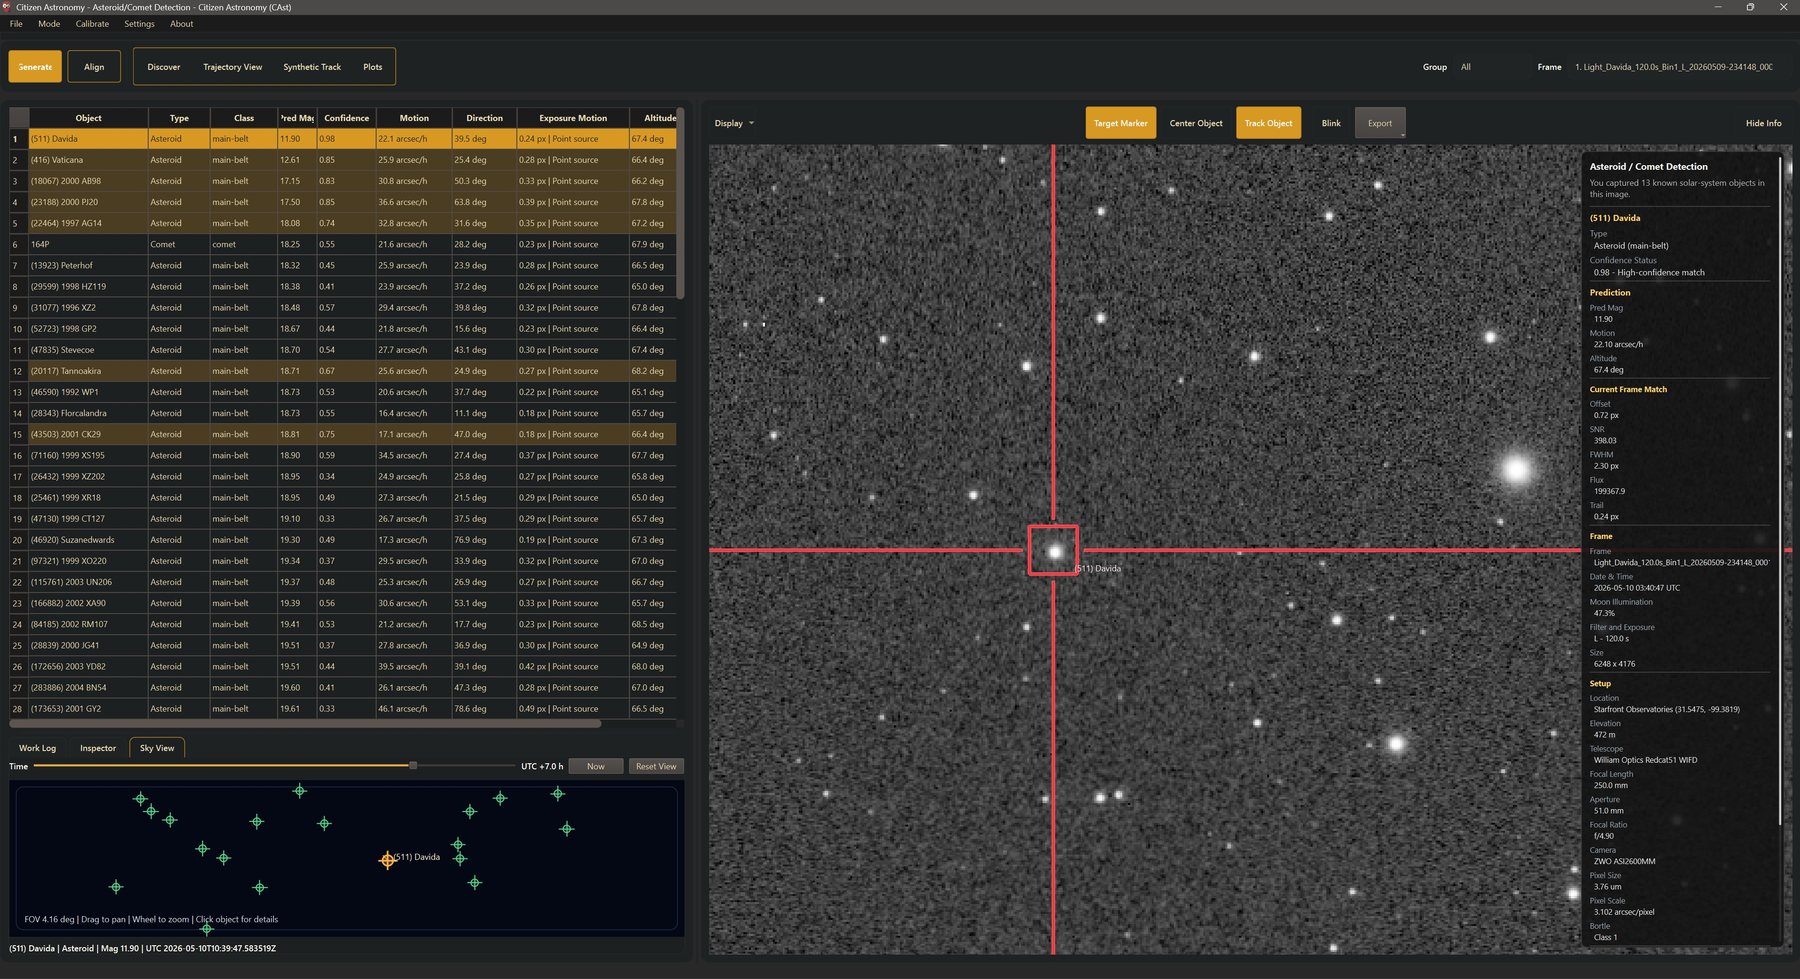
What moves in your frames
Asteroids and comets move against the stars.
From one exposure to the next, an asteroid or comet shifts while the stars stay fixed. In a sequence of frames, CAst predicts which catalogued objects should be in your field, checks whether your pixels recover them, and searches for movers it cannot match to a catalog.
And you can follow each one through your frames and see its path in 3D.
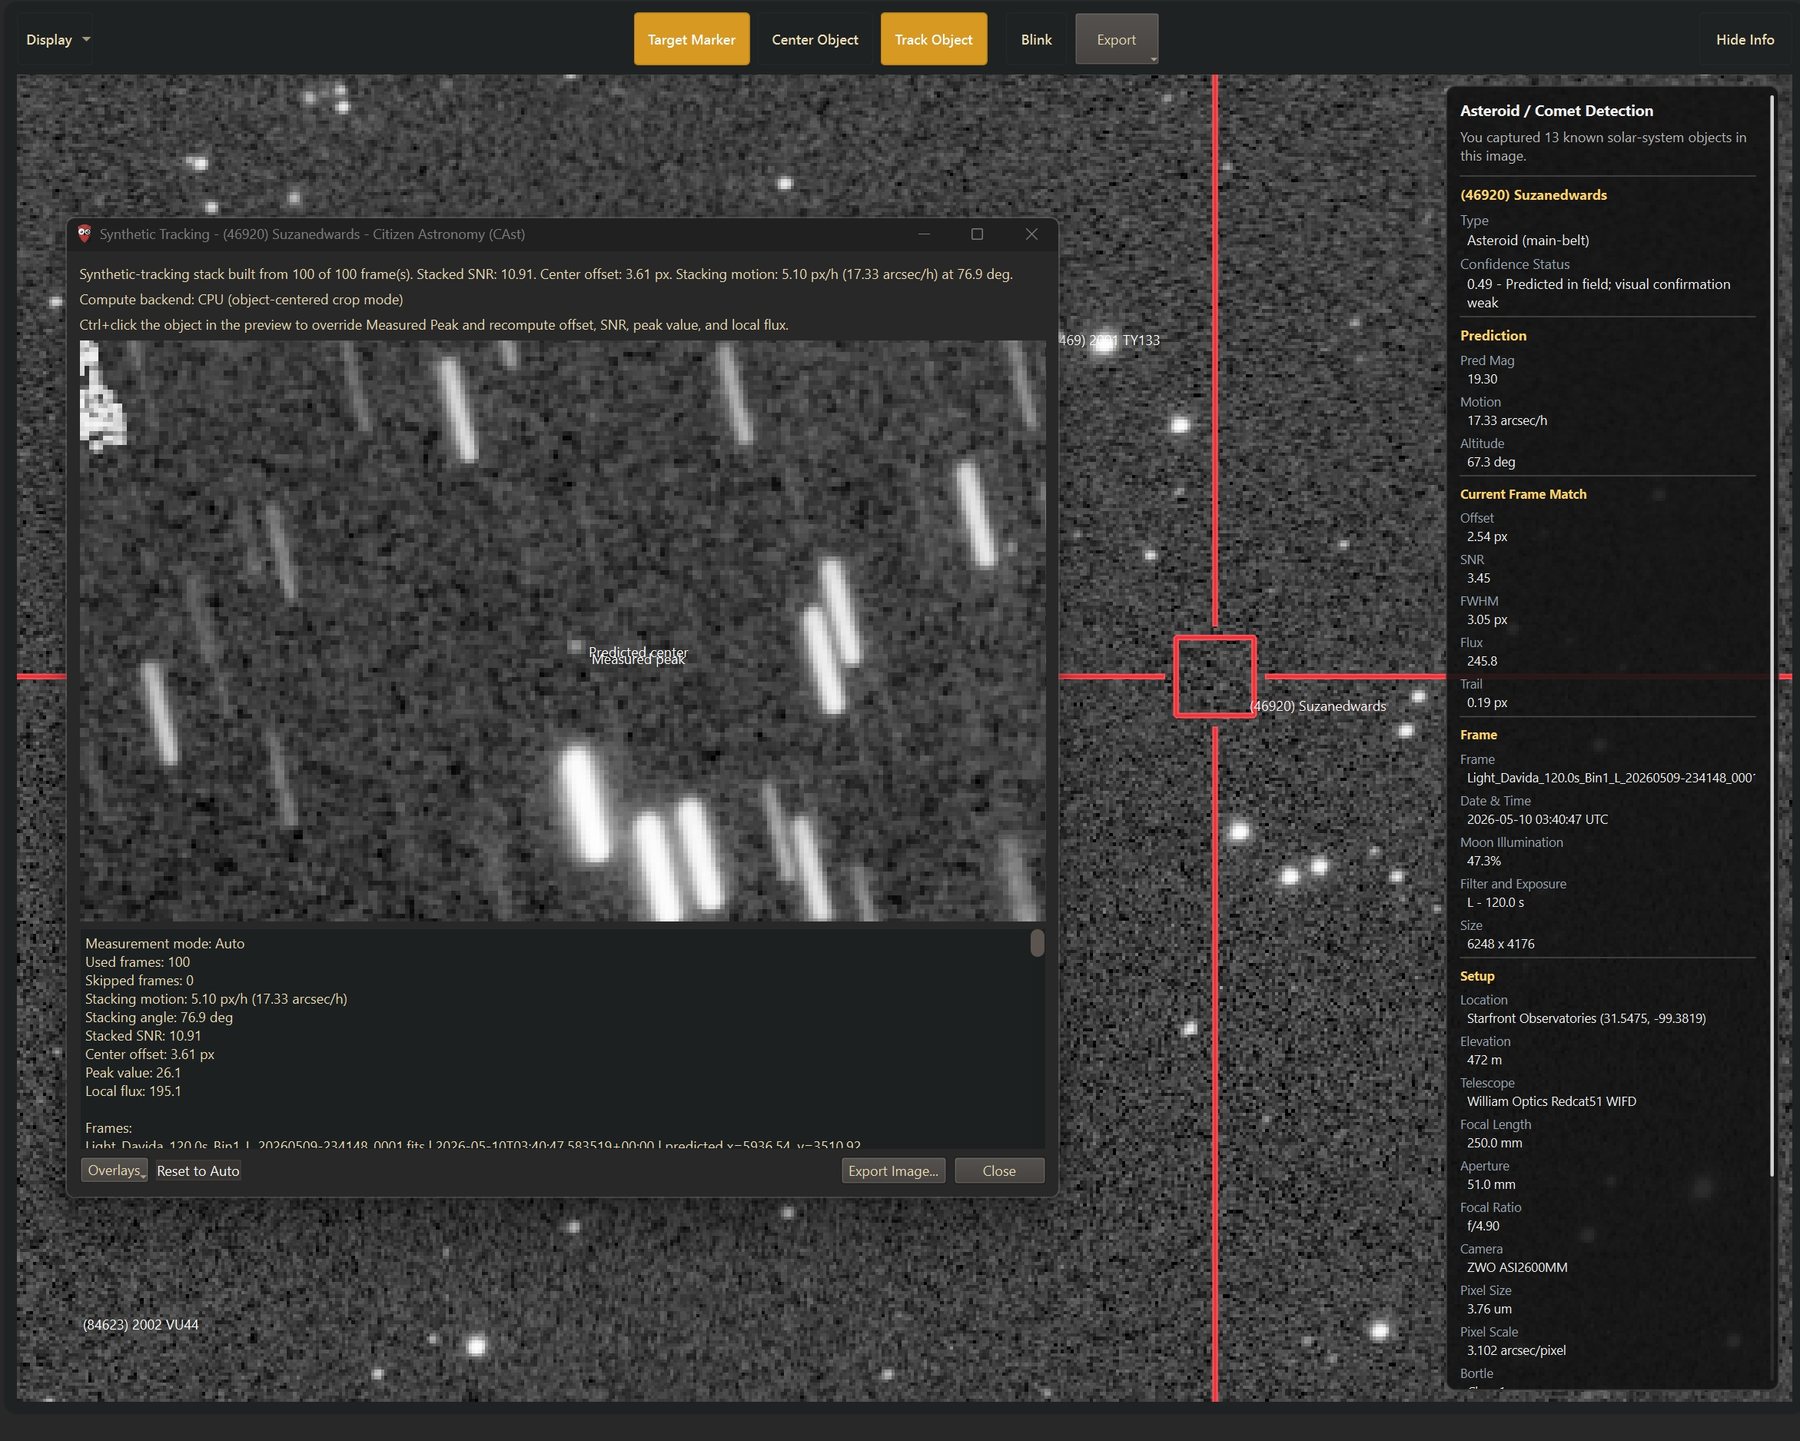
Confirm faint movers
Stack on the motion.
Synthetic Track shifts each frame along an object's motion and stacks them. A mover too faint for any single frame builds into a point, while the stars smear out.
Trajectory View then places the object among the planets, so you can play through time and follow its path.
Complete tutorial
From a folder of subframes to checked movers.
The step-by-step part follows the order you work in: known objects first, then stacking and discovery, then candidate checks, plots and orbits, and exports. Settings, column definitions, and how the calculations work are in the Reference part after it.
What this mode does
Asteroids and comets give themselves away by moving. In one frame an asteroid looks like a faint star; across a sequence it drifts while the stars stay put. This mode works with that motion. It asks an ephemeris service which known asteroids and comets should be in your field at the time of your frames, places them on the image, and measures whether each one is really there. It then subtracts the static sky and looks for anything else that moved in a straight line.
It looks for moving objects. For sources that stay in place and change brightness, use Transient Finder.
- List the known objects in your field. SkyBoT predictions are projected onto your frame, matched to local peaks, and scored. Step 05
- Inspect each one. Predicted and measured positions, motion, magnitude, and a motion-only sky map. Step 06
- Blink and track. Play the sequence while the selected object stays centered. Step 07
- Stack on the motion. Synthetic Track shifts every frame with the object so a faint one sharpens into a point. Step 08
- Align the sequence. Reproject solved frames onto one grid as FITS copies. Step 09
- Search for unmatched movers. Discover links residual detections into tracklets and checks how many known objects it recovered. Step 10
- Label and train. Save your verdict on each candidate and train a local model that scores new ones. Step 12
- Check a candidate. A checklist for deciding what a candidate is, and what reporting needs. Step 13
- Plot the path. Predicted against measured positions, offsets, and SNR over time. Step 14
- See the orbit. A 3D heliocentric view from JPL Horizons with time playback. Step 15
- Export. Images, blink and trail animations, stacks, orbit animations, and CSV tables. Step 16
Before you begin
- Images
- A folder of subframes of one field taken over time, or a single frame. FITS, XISF, TIFF, PNG, JPEG, and camera RAW files are read. For Discover you need at least three frames of the same filter and exposure; more frames over a longer span make motion easier to see.
- Plate solving
- Finding known objects works on unsolved frames: CAst solves the current frame when needed. Align and Discover read the WCS stored in each file, so for those every frame must already be plate-solved. For reliable solving, add an astrometry.net key in Settings > Open Settings > General > Astrometry API Key.
- Timestamps
- Every frame needs an observation time (
DATE-OBS) and preferably an exposure time, because predictions are computed at mid-exposure. Times without a timezone are read in Image Timestamp Timezone (Settings > Open Settings > Differential Photometry, under Science Export). - Observing site
- Enter your latitude, longitude, and elevation in Settings > Open Settings > Setup. CAst uses them to drop objects below your horizon, and shows them with your telescope and camera in the image information panel.
- Internet
- SkyBoT, JPL Horizons, IMCCE Miriade, the star catalogues, and astrometry.net are online services. Results are cached where possible.
Step by step
Find, confirm, and follow moving objects
Follow the steps in order the first time. Leave the settings at their defaults for a first run.
Open the mode
- On the mode picker, under SCIENCE WORKFLOWS, click Asteroid / Comet Detection.
- If CAst is already open in another mode, choose Mode > Asteroid/Comet Detection instead.
The workflow row along the top shows Open and Align, then Trajectory View, Synthetic Track, Discover, and Plots, and on the right the Group and Frame selectors. Below it, the Predicted Objects table is on the left with the Work Log, Inspector, and Sky View tabs underneath, and the image view is on the right. Every control is listed in R1.
Open your frames
- Click Open on the workflow row.
- In Select subframe folder for asteroid/comet detection, choose the folder that holds your frames and confirm.
CAst reads every supported image in the folder, sorts the frames by observation time, shows the first one, and starts finding known objects right away (Step 05). The Open button then reads Generate.
There are two other ways in:
File > Open Folder
Loads the folder the same way but does not start. Pick a Group and Frame first, then click Generate. Use this to switch to another folder later.
File > Open File
Opens one frame and starts finding known objects on it. Blink, Align, Discover, and Synthetic Track need more than one frame.
- Ctrl + O: File > Open File
- Ctrl + Shift + O: File > Open Folder
Groups and frames
If the folder mixes filters or exposure times, Group lists All plus one entry per combination, for example Filter L | 120 s (100). Blink, Discover, and Synthetic Track work on the selected group, and Discover needs a specific group rather than All. Frame picks the frame shown; it is also the reference frame for Generate, Align, and Discover.
Find the known objects
If CAst did not start automatically, or you changed the frame, click Generate. Then watch the Work Log. For the current frame, CAst:
- Checks the frame's WCS. If there is none, or it disagrees with the mount pointing in the header, it plate-solves the frame.
- Asks SkyBoT which asteroids and comets are inside the field at mid-exposure.
- Drops objects that fall outside the image or below your horizon, and asteroids more than 1 mag fainter than the magnitude limit (18.0 by default). Comets are kept whatever their listed magnitude.
- Places each object at its predicted pixel, looks for a peak nearby, and measures its offset and SNR.
- Fills Predicted Objects and selects the first row.
The Work Log ends with a line such as Detection complete: predicted 13 objects, likely visible 6, current frame ….
To list fainter objects, open Settings > Open Settings > Asteroid/Comet > Search, turn on Use manual detection magnitude limit override, set Manual Limit, and click Generate again.
How predictions are made and scored is in R6.
Read the results
Each row in Predicted Objects is one known asteroid or comet. Highlighted rows are likely visible: CAst found a peak with SNR at least 4 within 8 pixels of the prediction.
| Column | Meaning |
|---|---|
| Object, Type, Class | Name or designation, asteroid or comet, and orbit class. |
| Pred Mag | Predicted V magnitude from SkyBoT. |
| Confidence | Triage score from 0 to 0.99 (R6). |
| Motion, Direction | Sky motion in arcsec/h and its direction in the image. |
| Exposure Motion | Pixels moved during one exposure: Point source below 1.5 px, Tail likely above. |
| Altitude | Height above your horizon at the frame time. |
- Click a row. The image centers on the object, and the information panel on the right of the image shows its prediction and the Current Frame Match: offset, SNR, FWHM, flux, and trail.
- Open the Inspector tab for the same details as text, including the predicted RA/Dec and pixel position.
- Click Target Marker to draw a marker on the selected object.
- Change Frame. The predicted position and the match are recomputed for that frame from its own WCS and time.
Predicted against measured
The marker sits on the predicted position. The offset is the distance from there to the peak CAst measured. A small offset with good SNR means the object is where the ephemeris says. A large offset or low SNR can mean the object is fainter than your frame reaches, blended with a star, or that the prediction is off. Plots shows the offset on every frame.
Sky View
The Sky View tab draws only the predicted objects, without stars, so you can see how they move relative to each other. Drag Time to move up to 12 hours either way, click Now to return to the frame time, and Reset View to recenter. Drag to pan, scroll to zoom, and click an object to select its row.
Blink and track an object
- Select an object in Predicted Objects.
- Make sure Track Object is on (it is by default).
- Click Blink. The first time, CAst preloads the frames of the active group, then plays them.
- Watch the center of the view: a real mover shifts steadily from frame to frame while the stars stay fixed.
- Click Blink again to stop.
Center Object centers the selection once and zooms to at least 3×. Hide Info hides the information panel so the field has more room. Use Display to change the stretch, open Curves, or invert the image.
- Mouse wheel: zoom the image
- Left-drag: pan the image
The playback speed is Blink Frame Time in R3.
Stack on an object
A faint asteroid may hardly show on any single frame. Synthetic Track moves each frame along with the object and stacks them, so the object adds up into one point while the stars smear into short streaks.
- Pick a single filter/exposure group in Group if the folder has more than one.
- Select the object in Predicted Objects.
- Click Synthetic Track. A progress dialog shows each frame being added.
- In the Synthetic Tracking window, read the summary line: frames used, Stacked SNR, center offset, and the stacking motion.
- If the measured peak landed on the wrong spot, hold Ctrl and click the object in the preview. The offset, SNR, peak, and flux are recomputed. Reset to Auto undoes it.
- Use Overlays to show or hide the Predicted center, Auto peak, Measured peak, and Known objects markers and labels.
- Click Export Image... to save the stack, or Close.
- Ctrl + click in the preview: set the measured peak by hand
To set the motion yourself, stack the full image, or run on the GPU, see R4. How the shift and stack work is in R8.
Align the frames
Discover compares frames pixel by pixel, so the frames must share one grid. You can align them here once, or let Discover align them each time it runs (Step 10).
- Set Frame to the frame you want as the reference grid.
- Click Align. If it is greyed out, hover it: the tooltip names the first frame that has no stored WCS.
- Wait for the Work Log line
Loaded aligned sequence from ….
CAst reprojects every loaded frame onto the reference WCS, refines the shift on stars, and writes FITS copies to an aligned subfolder. Your originals are not changed. The aligned copies are loaded in their place, so run Generate again before Discover.
Run Discover
Discover looks for things that moved but are not on the known-object list. It needs a finished Generate, a specific group, at least three frames, stored WCS on every frame, and a finished blink preload. If the button is greyed out, its tooltip says which is missing.
- Choose a single filter/exposure Group.
- Click Discover.
- If you ran Discover on this group before, choose Restore Last Result to reopen it or Run New Scan.
- In Discover Pipeline, keep Preset on Detailed search for the most complete search, or choose Fast scan for a quick first pass.
- Set Alignment to Already aligned if you used Align, otherwise leave Align first.
- Click Run Discover.
A Discover progress dialog opens with Cancel, and the Discover Results window fills in as each batch finishes. The other options are in R2; whatever you run with becomes the new default.
If you turned on Final Synthetic Sweep in the settings, Discover stops after the normal search and asks Continue Discover Sweep?. The sweep is slow. Click No to review what you have; the Continue button in Discover Results runs the sweep later.
How Discover finds and links detections is in R7.
Review Discover results
The top of Discover Results summarizes the run: Visible Limit (how faint your frame reaches, measured on catalogue stars), Known In Limit, Recovered In Limit, Potential Discoveries, and Borderline Review. The tables are on the left, and the reference image with the selection is on the right.
| Tab | What it lists |
|---|---|
| Known Recovered | Known objects that Discover found on its own in the residuals. |
| Known Missed | Known objects it did not find, with whether they were within the visible limit. |
| Potential Discoveries | Unmatched tracklets that follow a straight line closely. |
| Borderline Review | Unmatched tracklets that wobble more, for you to judge. |
The two Known tabs are a recovery check. If Discover recovered most known objects within the limit, it was able to see objects of that brightness, so its unmatched list deserves a look. If it missed many, the frames or settings are limiting it.
- Open Potential Discoveries and click a candidate. The details box lists every frame detection.
- Click Trajectory... to plot its path (Step 14).
- Click Synthetic Track... to stack on its motion.
- Select one or more candidates and click Mark Selected to draw them on the main image.
- Click Close when done. The result is kept.
Back in the main window, every Potential Discovery appears in Predicted Objects as a row named Candidate C… with Type Potential. Select it to blink and track it, stack on it, or plot it like a known object. Changing Group clears the marks.
A Potential Discovery is a tracklet that moved in a straight line across your frames. It is not a confirmed discovery. Step 13 describes how to check one.
Label candidates
Labels record your verdict on each candidate. Once you have a few, CAst can train a model that scores new candidates the way you would.
- In Discover Results, open Potential Discoveries or Borderline Review.
- Click Label.... Label Discover Candidates opens with a cutout that blinks through the candidate's frames.
- Click Real Mover, Artifact, Known Object, Noise, or Unsure. The label is saved and the next candidate appears. Use Previous and Skip to move without labeling, and the speed list next to Auto Blink to change the blink.
- Back in Discover Results, click Train Model.
You can also label one row at a time with the Candidate Label list and Save Label. After training, the ML Score column shows the model's guess and confidence. Details are in R9.
Check a candidate
Most candidates are hot pixels, cosmic rays, satellite glints, noise that happens to line up, or known objects whose prediction was off. Work through these checks before you trust one.
- Blink it. Select its Candidate C… row with Track Object on and click Blink. A real object is a point source that moves the same distance between equally spaced frames.
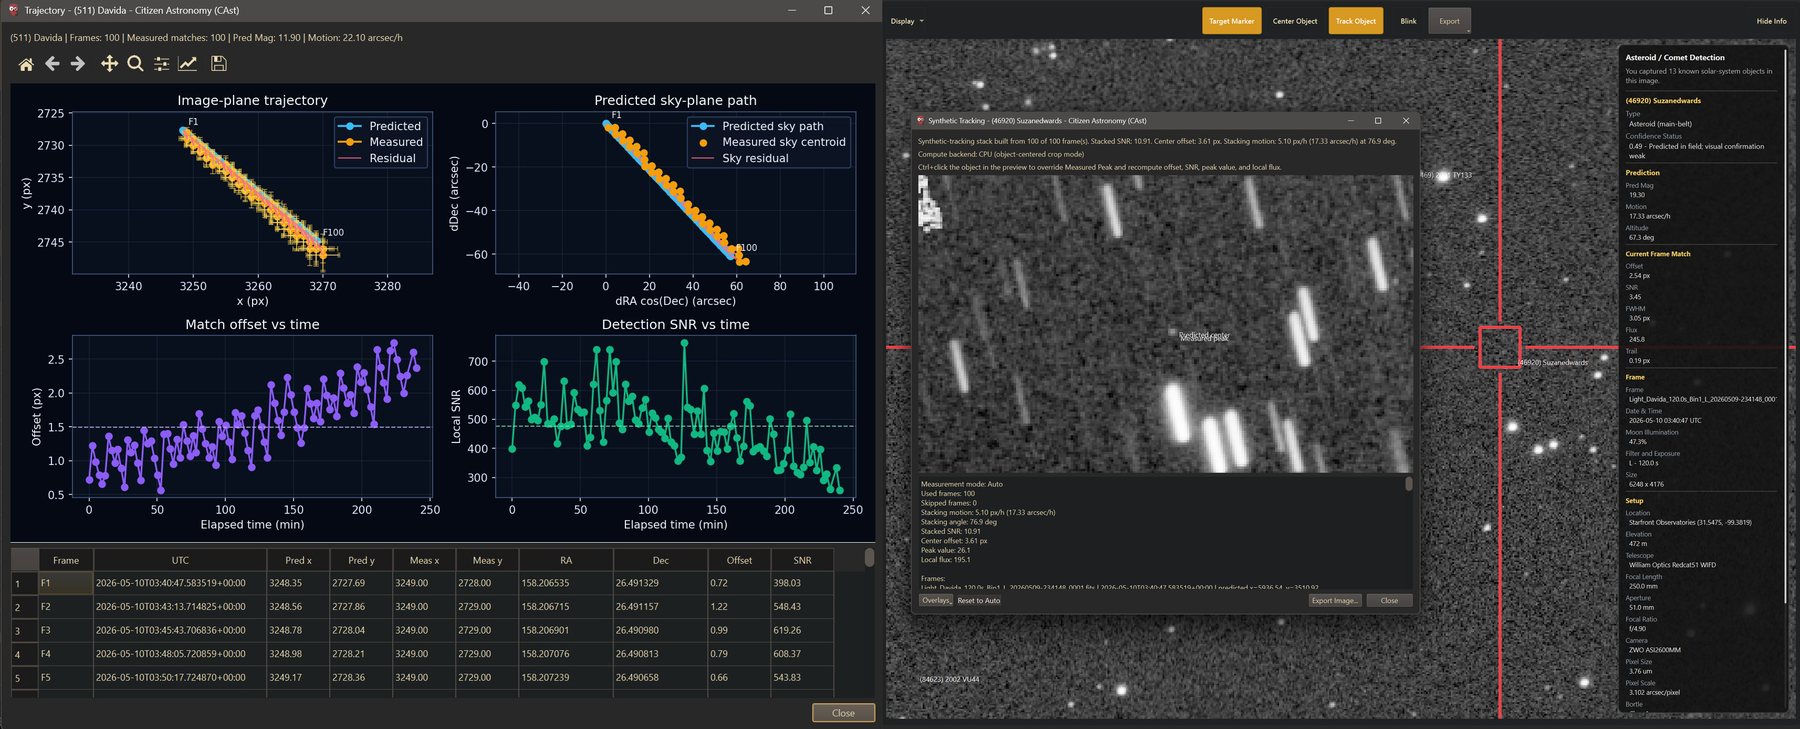
- Look at the path. Click Plots. The measured positions should follow the linear fit with small residuals. Jumps, or a cluster that does not move, point to an artifact.
- Stack on it. Click Synthetic Track. A real mover sharpens into a point, and its Stacked SNR should be clearly higher than on single frames.
- Rule out known objects. Look at Known Missed. A known object near the candidate with similar motion is the likely answer. Raise Manual Limit and click Generate again to list fainter known objects.
- Rule out fixed sources. Open the frame in Sky Explorer to see whether a catalogued star or galaxy sits on the track.
- Check the Minor Planet Center. Use its online tools to search for known objects at the candidate's position and time.
- Observe again. Image the field on another night and recover the object where its motion says it should be.
Reporting
Reports of asteroid and comet positions go to the Minor Planet Center. It expects the time, RA, and Dec of each detection from a registered observatory code, normally in ADES format, and a new object usually needs observations on more than one night. CAst does not write MPC or ADES reports. It shows per-frame RA/Dec for a candidate in the Inspector and in Plots, but those come from each frame's plate solution and are not checked for reporting-grade astrometry. Measure the positions in dedicated astrometry software before you submit.
Plot a path
- Select a row in Predicted Objects.
- Click Plots, or double-click the row.
A Trajectory - … window opens with four plots and a per-frame table.
Known object
Image-plane trajectory (predicted and measured positions with residual lines), Predicted sky-plane path, Match offset vs time, and Detection SNR vs time. The table lists predicted and measured x/y, RA, Dec, offset, and SNR for each frame.
Candidate
Image-plane trajectory (measured path and linear-motion fit), Sky-plane path, Pixel position vs time, and Residual score vs time. The table lists x, y, RA, Dec, residual, and peak for each frame.
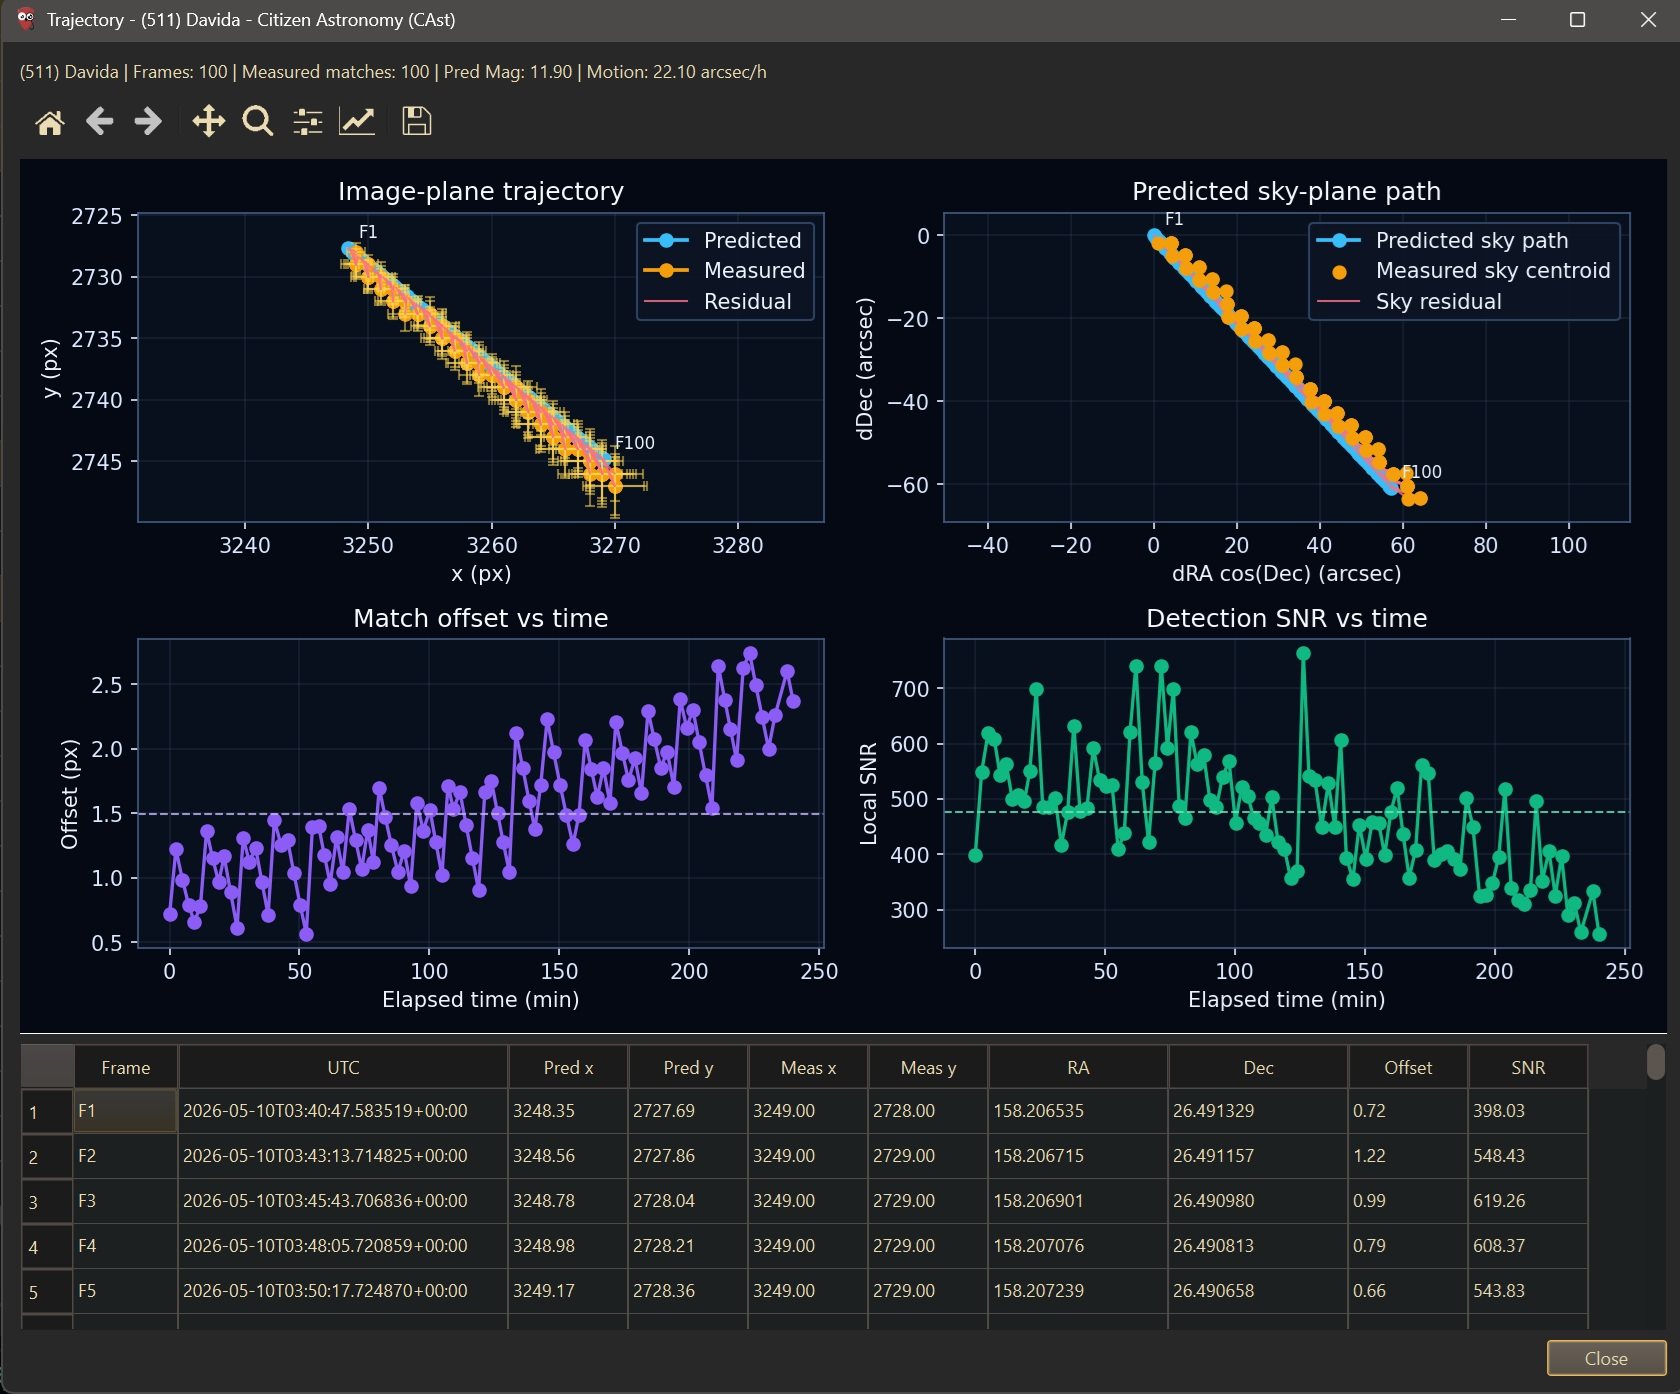
A steady offset that grows slowly, as here, usually means the ephemeris and your timing differ slightly. Scattered offsets with low SNR mean the match is unreliable. The toolbar above the plots pans, zooms, and saves the figure.
Open Trajectory View
Plots shows where the object went in your frames. Trajectory View shows where it is in the Solar System.
- Select one or more known objects in Predicted Objects. Ctrl-click or Shift-click to select several.
- Click Trajectory View. CAst queries JPL Horizons and opens a 3D View - … window.
- Drag in the scene to rotate and scroll to zoom. Choose a Camera such as Top-Down or Object Follow.
- Choose a longer Span, for example 1y, to see more of the orbit. Turn on Planets for context.
- Click the play button to run time forward, and set Speed. The return button next to UTC goes back to the observation time.
- Use Objects to show or hide objects, or Nearby Search... to add objects predicted around your field. Click Lookup to add any asteroid or comet by name.
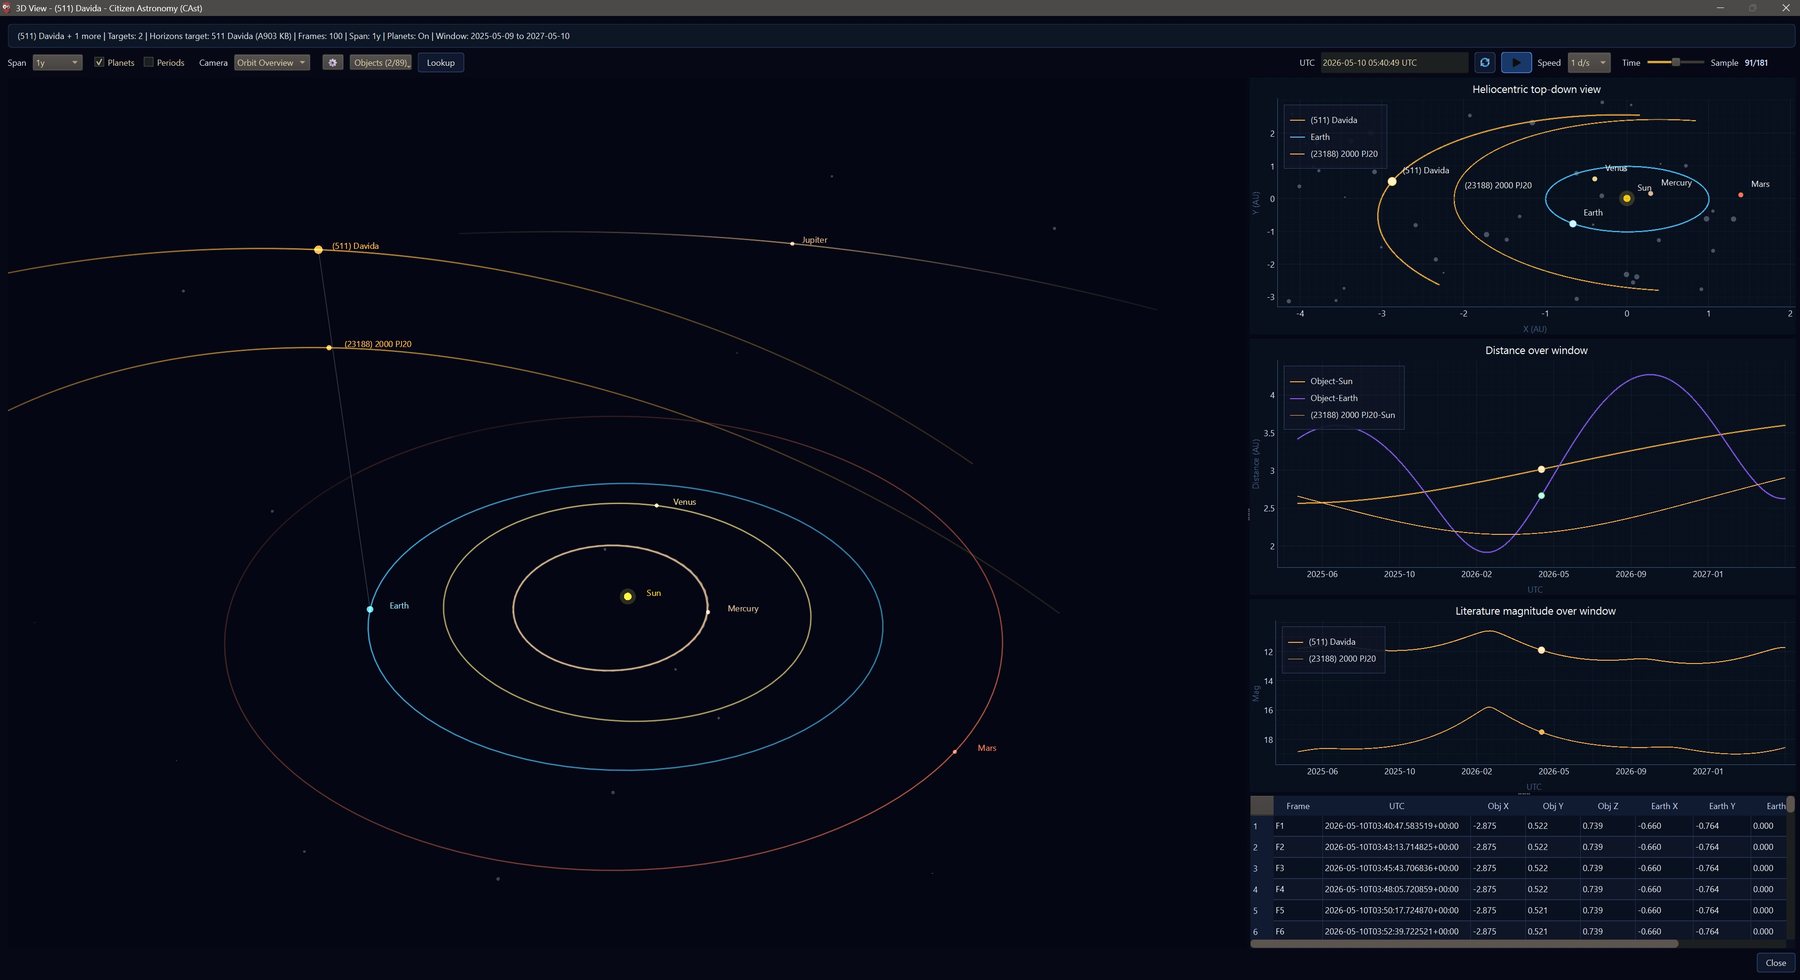
Candidates have no orbit yet, so they are not included. With nothing selected, Trajectory View opens an empty scene that you fill with Lookup. All controls are in R5.
Export
- Select the object you want in the file name, if any.
- Click Export above the image and choose:
- Image... to save the view as shown, as PNG, JPEG, or BMP
- Blink... to save the active group as a GIF or MP4 blink
- Trail... to save a GIF in which the stack on the selected object builds up one frame at a time
- Confirm the file name. The default uses the object, for example
(511) Davida_blink.gif, in your source folder.
Other exports live in their windows: Export Image... in Synthetic Tracking, Save in Trajectory View, the save icon in Plots, and Export... in Discover Results for the CSV tables. They are listed with formats in R10.
Reference
Controls, settings, and how it works
Look things up here after you know the workflow.
Workspace controls
Workflow row
- Open / Generate
- Open picks a folder and starts finding known objects. Once a source is loaded the button reads Generate and runs the known-object search on the current frame.
- Align
- Reprojects all loaded frames onto the current frame's WCS and loads the copies (Step 09).
- Trajectory View
- 3D orbit view for the selected known objects (Step 15).
- Synthetic Track
- Shift-and-stack on the selected object or candidate (Step 08).
- Discover
- Searches the active group for unmatched movers (Step 10).
- Plots
- Path and match plots for the selected row (Step 14).
- Group, Frame
- Active filter/exposure group and current frame.
Image toolbar
- Display
- Stretch (Auto Stretch, Linear, Asinh, Sqrt, Log), Curves, Invert, Reset View, Reset Display, Show RA/Dec (live coordinates under the cursor; on by default), Show Grid (off by default), and RA Density / Dec Density for the grid (2 to 12, default 5).
- Target Marker
- Draws the marker style from settings on the selected object only. Off by default; with it off, no object markers are drawn.
- Center Object
- Centers the selection once, at 3× zoom or more.
- Track Object
- Keeps the selection centered while blinking or changing frames. On by default.
- Blink
- Plays the active group. Preloads on first use.
- Export
- Image..., Blink..., Trail....
- Hide Info / Show Info
- Hides or shows the information panel on the image: Frame (time, Moon illumination, filter and exposure, size), Setup, Field, and the selected object's prediction and current frame match.
Lower tabs
- Work Log
- Timestamped messages from every task, including catalogue and SkyBoT queries and errors.
- Inspector
- Details of the selected row as text. For candidates it lists every frame detection with pixel position, RA/Dec, and residual score.
- Sky View
- Motion-only map of the predicted objects with Time, Now, and Reset View.
Drag the splitters to resize or collapse the panels. A collapsed panel leaves a Predicted Objects or Work Log · Inspector · Sky View handle; click it to restore the panel.
Mouse and keyboard
- Ctrl + O: open a file
- Ctrl + Shift + O: open a folder
- Mouse wheel: zoom the image (zooming out stops at the fitted view)
- Left-drag: pan the image
- Double-click a row: open Plots
- Ctrl or Shift + click rows: select several known objects for Trajectory View
- Ctrl + click in the Synthetic Tracking preview: set the measured peak
There are no right-click menus in this mode.
Discover Pipeline options
These appear each time you click Discover. The values you run with are saved as the new defaults.
- Preset
- Detailed search uses your saved defaults at full resolution. Fast scan uses at least 2x2 binning, the temporary cache, Residual Min SNR of at least 6, and smaller overlapping batches. Custom keeps whatever you set below.
Default: Detailed search.
- Alignment
- Align first reprojects the frames before searching. Already aligned skips that step.
Default: Align first.
- Working Binning
- Off (1x1), 2x2, 3x3, 4x4. Binning is faster and smooths noise but loses detail.
Default: Off.
- Motion Prior Bias
- Balanced, Main-belt bias, or Faster near-Earth bias: which motion rates linking prefers. A line below the form shows the typical motion in pixels during one exposure.
Default: Balanced.
- Temporary Cache
- Writes prepared frames to an auto-cleaned cache.
Default: off.
- Residual Min SNR, Residual Max SNR
- Drop residual detections below or above a local SNR before linking.
Default: Disabled.
- Min Seed Displacement
- Minimum start-to-end motion for a track seed. Lower values allow slower movers and more false seeds.
Default: 1.5 px.
- Frames per Batch
- Splits a long group into overlapping windows.
Default: Whole group.
- Single Batch
- Run one sampled batch only (10 frames if batching is off).
Default: off.
- Retry with detailed search
- If no candidates are found, repeat with the detailed full-resolution search. Available with Fast scan and Custom.
Default: off.
Asteroid/Comet settings
Open Settings > Open Settings > Asteroid/Comet. The settings are split into Search, Visuals, and Export tabs. Hover a label for its tooltip.
Search: Estimate Options
- Manual Override, Manual Limit
- Use manual detection magnitude limit override replaces the default 18.0 mag limit used by Generate with Manual Limit.
Default: off, 18.0 mag.
- SNR Threshold, Start Mag, Amount of Stars to Check, Visible Stars Needed
- Control the visible-limit estimate shown in Discover Results (R6).
Defaults: 4.0, 15.0 mag, 6, 3.
- Annotate Lowest Mag Stars
- Marks the faintest confirmed stars after an estimate.
Default: off.
Search: Discovery Advanced
- Search Workers
- Background workers for Discover and its sweep.
Default: Auto.
- Working Binning, Temporary Cache, Frames per Batch
- Saved defaults for the matching Discover Pipeline options.
- Edge Margin
- Ignores residuals this close to the frame border.
Default: 6 px.
- Residual Min SNR, Residual Max SNR
- Saved defaults for the residual SNR filters.
Default: Disabled.
- Point Detection Threshold, Point Detection FWHM
- Sigma threshold and expected width for the point-source residual finder.
Defaults: 5.0 sigma, 3.0 px.
- Max Residuals / Frame
- Caps how many residuals per frame are kept for linking.
Default: 24.
- Residual Detector
- Hybrid (point + streak), Point-like only, or Streak-aware only.
Default: Hybrid.
- Streak Min Area, Streak Min Elongation
- Minimum size and length-to-width ratio for streak detections.
Defaults: 6 px, 1.8×.
- Minimum Linked Frames
- Frames a tracklet must span to be kept. Also the minimum frame count for Discover.
Default: 3.
- Potential Deflection RMS, Review Deflection RMS
- How straight a tracklet must be for Potential Discoveries, and for Borderline Review. Above the second, it is discarded.
Defaults: 0.9 px, 1.8 px.
- Final Synthetic Sweep
- Runs a velocity-grid shift-and-stack pass after normal linking. The slowest option.
Default: off.
- Sweep Max Motion, Sweep Motion Step, Sweep Angle Step
- The velocity grid the sweep tests.
Defaults: 12 px/h, 1.0 px/h, 30°.
- Sweep Direction Focus, Sweep Focus Width
- All directions (360 deg) or Main-belt direction focus, which tests only directions within the half-width of the motion of known main-belt asteroids in the field.
Defaults: All directions, 45°.
- Sweep Min Stacked SNR
- Stacked SNR a sweep peak needs to become a tracklet.
Default: 6.0.
- Save Sweep Stacks
- Writes every tested stack as FITS to
synthetic_trackin the data folder. Dense sweeps create many files.Default: off.
- Track Crop Radius, Track Integration, Track Weights, Track Rejection, Track Backend, Track Mixed All Group, Advanced Synthetic Track
- Synthetic Track defaults, described in R4.
Visuals
- Show marked potential discoveries on the main image
- Draws candidates you marked with Mark Selected.
Default: on.
- Show asteroid/comet name labels on the main image
- Labels the selected object.
Default: on.
- Marker style
- Square aim, Circle, Corner brackets, Open crosshair, Pointer.
Default: Square aim.
- Track Object Anchor
- Known / predicted position or Detected local match.
Default: Known / predicted position.
- Highlight the selected asteroid/comet with distinct colors
Default: on.
- Invert also swaps asteroid/comet annotation and text colors
Default: on.
- Marker Appearance
- Line Color, Accent Color, Label Color, Outline Color, Thickness.
Default thickness: 4.0 px.
Export
- Blink Frame Time
- Time per frame for Blink and its exports, from 0.05 s to 2.00 s.
Default: 0.05 s.
- GIF Resolution, MP4 Resolution
- Scale of exported animations, 25% to 400%.
Default: 100%.
- GIF Looping
- Loop exported GIF playback forever.
Default: on.
Synthetic Track options
Defaults are under Settings > Open Settings > Asteroid/Comet > Search > Discovery Advanced > Preparation.
- Track Crop Radius
- Radius of the object-centered stack.
Default: 24 px.
- Track Integration
- Average (unweighted), Mean (weighted), Min, or Max.
Default: Average.
- Track Weights
- Frame weighting for Mean: PSF signal weight, PSF SNR, SNR, Average signal strength.
Default: PSF signal weight.
- Track Rejection
- No rejection, Min/Max, Sigma clipping, Winsorized sigma clipping, Averaged sigma clipping.
Default: No rejection.
- Track Backend
- Auto, CPU only, or GPU when available.
Default: Auto.
- Track Mixed All Group
- Allow running from mixed 'All' groups.
Default: off.
- Advanced Synthetic Track
- Open manual one-stack dialog before each run.
Default: off.
Advanced Synthetic Track dialog
With Open manual one-stack dialog on, clicking Synthetic Track opens Advanced Synthetic Track - … first:
- Choose Stack Scope: Object-centered crop follows the predicted position frame by frame; Full image (manual motion) shifts whole frames by a fixed motion.
- For a crop, set Track Crop Radius. For a full image, check Motion (px/h) or Motion (arcsec/h) and Angle, which start at the object's motion.
- Set Integration, Weights, and Rejection.
- Click Run Synthetic Track.
GPU path
Full-image stacks can run on an NVIDIA GPU through CuPy. With Auto, CAst uses the GPU when CuPy is available and Rejection is No rejection; any other rejection mode runs on the CPU. GPU when available requests the GPU but falls back the same way, and CPU only never uses it. The first GPU run in a session warms the backend up. The Synthetic Tracking window shows which backend ran, for example Compute backend: GPU (CuPy full-frame no-rejection stack), and why it fell back if it did. Object-centered crops always run on the CPU.
Trajectory View controls
- Span
- Local (45 days either side of your frames), +/-90d, +/-180d, 1y, 5y, or Custom with From, To, and Apply. Changing the span keeps the selected objects.
- Planets, Meteor Stream, Periods
- Show the planets; show an illustrative debris tube along the orbit of a known meteor-shower parent such as 109P/Swift-Tuttle (a teaching model, not a dust forecast); show orbital periods.
- Camera
- Orbit Overview, Top-Down, Side View, Object Follow, Earth Follow.
- ⚙ (Display settings)
- Show Labels, Show Sample Points, label Font, Size, Bold, Italic; Asteroids and Comets colors; Meteor Stream Point density, Trail thickness, Orbit guide line, Glow, Animate debris, Drift speed; Sky Track Bayer designations, Star density, Star draw radius, Constellation lines, Fit Trajectory, Entire Sky; and Info panels with Move Up, Move Down, Remove, Reset Layout, and Add Panel.
- Info panels
- Heliocentric top-down, Sky Track, Magnitude (literature magnitude over the window), and Distance by default. Data, a per-frame table of object and Earth positions and distances, can be added.
- Objects (n/m)
- Toggles each object's visibility. Nearby Search... opens Nearby Field Search: set Radius and Max predicted mag, click Search Nearby, select rows, and click Add Selected.
- Lookup
- Object Lookup searches the small-body database by name, designation, or keyword (for example
Pallas,154P,3I) and adds the rows you select. - Save
- Save Trajectory View: choose Trajectory view only or Trajectory view + info panel, a Format (PNG, JPG, GIF, MP4), and for animations a Camera motion (Fixed, Slow orbit, Object chase). An animation covers one pass of the timeline at the current speed.
- UTC, Play, Speed, Time, Sample
- Type a time, return to the observation time, play, choose 1 h/s to 30 d/s (default 1 d/s), or drag the slider through the samples.
How known objects are predicted
Plate solution
Generate uses the frame's embedded WCS when it agrees with the mount pointing in the header. Otherwise it runs local Gaia matching and astrometry.net at the same time (astrometry.net only with an API key) and keeps whichever solves first.
Ephemeris services
- SkyBoT (IMCCE)
- Main cone search for asteroids and comets in the field, geocentric, at mid-exposure. The radius is the solved field radius, limited to 0.01° to 10°. A relaxed position-error filter (3600″) keeps objects with uncertain orbits. Server errors and unreadable replies are retried, and failures are written to the Work Log.
- JPL Horizons, IMCCE Miriade
- Used for the interstellar object 3I/ATLAS, which CAst adds or refreshes from Horizons, with Miriade as the fallback. Horizons also supplies the heliocentric positions in Trajectory View.
- Small-body database
- Searched by Lookup in Trajectory View.
Magnitude limit
Generate uses 18.0 mag, or Manual Limit when the override is on. Asteroids listed more than 1 mag fainter than the limit are dropped. Comets are always kept, because their listed magnitudes are often unreliable. Pred Mag is SkyBoT's V magnitude: good for triage, not a photometric prediction.
Local match and confidence
Around each predicted pixel, CAst searches a window of about 5 to 18 pixels (larger for faster objects) and measures the peak. SNR is the peak minus the local median, divided by 1.4826 × the median absolute deviation. An object is likely visible when SNR is at least 4 and the offset is at most 8 px.
Confidence starts at 0.1 and adds up to 0.25 for how much brighter than the limit the object is, up to 0.4 for SNR (SNR / 20), up to 0.25 for a small offset (falling to zero at 10 px), and 0.05 if the object trails more than 1.5 px. It subtracts 0.15 near the frame edge, and is capped at 0.99. It is a triage score, not a probability.
| Status | Condition |
|---|---|
| High-confidence match | Likely visible and confidence at least 0.75 |
| Plausible visible match | Likely visible and confidence at least 0.5 |
| Predicted in field; visual confirmation weak | Brighter than the limit, but weak in the image |
| Predicted in field | Predicted, without a local confirmation |
Visible limit
Discover measures how faint the frame reaches. It takes catalogue stars in the field (Gaia DR3 to about G 21.5, and, fainter than 20.5 mag, Pan-STARRS north of Dec −30° or DES with SkyMapper as a fallback in the south), steps through 0.5 mag bins from Start Mag, and checks whether at least Visible Stars Needed of Amount of Stars to Check stars per bin are recovered at SNR Threshold. The faintest passing bin is the Visible Limit. Trailing, bandpass, and crowding still change what you can recover in practice.
How Discover links detections
- Prepare. Align, bin, and cache the frames as chosen in Discover Pipeline.
- Model the static sky. Take the per-pixel median of the aligned frames. Stars, galaxies, and anything else that stays put end up in this model; a moving object does not, because it is in a different place on most frames.
- Make residuals. Subtract the model from each frame. What remains is noise plus anything that moved or changed.
- Detect. Find residual peaks with a point-source finder, a streak finder, or both. Residuals within 6 px of a known prediction are set aside so known objects are not counted as discoveries.
- Seed. Pair detections on nearby frames (up to two frames apart) that moved at least Min Seed Displacement at a plausible rate for the motion prior.
- Link. Fit straight-line motion through the seed, x(t) = a + vxt and y(t) = b + vyt, predict where the object should be on every other frame, and pick up detections within about 2.8 px. Refit and repeat a few times.
- Screen. Keep tracklets with at least Minimum Linked Frames. Measure the RMS deviation from the straight line: up to 0.9 px goes to Potential Discoveries, up to 1.8 px to Borderline Review, and the rest is discarded.
- Benchmark. A known object counts as recovered when a tracklet follows its predicted path within about 4.5 px, or its catalogue position uncertainty if larger.
- Sweep (optional). With Final Synthetic Sweep on, stack the residuals along every motion on a grid of rates and directions, and turn stacked peaks above Sweep Min Stacked SNR back into tracklets. This finds objects too faint to detect on single frames.
The method assumes straight, constant-speed motion over the sequence. Very fast near-Earth objects, long sequences with curved paths, and badly trailed objects can fail to link.
How Synthetic Track stacks
Stacking adds signal faster than noise: an object at the same pixel on N frames gains about √N in SNR. Synthetic Track keeps the object on the same pixel by moving the frames with it.
Object-centered crop
For each frame, CAst predicts the object's position at that frame's time from the ephemeris (or, for a candidate, from its fitted motion), and cuts out a patch of Track Crop Radius around it with subpixel bilinear sampling. The patches are stacked with the predicted position at the center.
Full image
Each whole frame is shifted by the motion vector times the time since the first frame. This is useful when you want to test a motion by hand or see the whole field in the object's frame.
Outlier pixels are rejected if a rejection mode is set, then the stack is combined with the chosen integration. CAst finds the peak near the center and reports stacked SNR, center offset, peak value, and flux. Frames are skipped when the object falls outside them or their time is missing; the window lists each frame and the reason.
If the object really moves at the assumed rate, it builds up into a point. If the motion is wrong, it smears too, and the SNR stays low.
Labels and model scores
- Labels
- Real Mover, Artifact, Known Object, Noise, Unsure. Saving a label again for the same candidate replaces it.
- Train Model
- Fits a Random Forest on every saved asteroid/comet label and the candidate's measured features. It needs at least two labeled candidates with two different labels. With six or more labels and at least two per label, it also reports validation accuracy, precision, recall, and F1 on a held-out quarter.
- ML Score
- The latest model's predicted label and confidence for each candidate. It does not hide or reorder candidates.
- Storage
- Labels and models are saved on your computer in
%LOCALAPPDATA%\CitizenPhotometry\candidate-training.sqlite3on Windows.
Exports and files
| Export | Where | Formats |
|---|---|---|
| Image view as shown | Export > Image... | PNG, JPEG, BMP |
| Blink of the active group | Export > Blink... | GIF, MP4 |
| Stack building up on the selected object | Export > Trail... | GIF |
| Synthetic Track stack | Export Image... in Synthetic Tracking | PNG, JPEG, BMP, or linear FITS |
| Plots figure | Save icon in the plot toolbar | Image formats offered by the toolbar |
| Trajectory View | Save | PNG, JPG, GIF, MP4 |
| Known-object benchmark | Export... > Benchmark CSV... in Discover Results | CSV |
| Candidates with positions and times | Export... > Candidate Review CSV... | CSV |
| Run summary | Export... > Summary CSV... | CSV |
| Aligned frames | Align | FITS in aligned |
| Sweep stacks | Save Sweep Stacks setting | FITS in synthetic_track |
Default names include the selected object, for example 2015 CU58_trail.gif, and go in the source folder. Discover CSVs are named after the reference frame, for example …_discover_candidates.csv. The candidate CSV holds pixel positions, detection times, and frame paths; per-frame RA/Dec is in the Inspector and Plots. CAst does not write MPC or ADES reports.
Troubleshooting
The Work Log reports a missing observation time or timestamp
The frame has no DATE-OBS or equivalent. Predictions, Discover, and full-image stacks all depend on the time of each frame, so add it to the header in your capture or stacking software and open the frames again.
The table is empty, or shows far fewer objects than I expected
Check the Work Log. If SkyBoT failed, the log shows the error and response; try again later. Otherwise the field may truly contain few objects brighter than the limit: raise Manual Limit and click Generate. Objects below your horizon are dropped, so check the site in Settings > Setup.
Markers are clearly off from the objects
Usually the time is wrong: a local time read as UTC, or a start time without the exposure length. Check Image Timestamp Timezone and that the header has an exposure time. A bad plate solution has the same effect; if stars do not line up with Show Grid, re-solve the frames.
Align or Discover is greyed out
Hover the button. Both need every frame to have a stored WCS; plate-solve the frames and open the folder again. Discover also needs a finished Generate, a specific Group instead of All, at least Minimum Linked Frames frames, and a finished blink preload.
Synthetic Track is greyed out on All
Pick one filter/exposure group, or turn on Allow running from mixed 'All' groups under Settings > Asteroid/Comet > Search > Discovery Advanced > Preparation. Synthetic Track also needs a selected row and at least two frames.
Synthetic Track used the CPU when I asked for the GPU
The GPU path is only used for Full image (manual motion) stacks with No rejection, and only when CuPy is installed. The window states the reason for the fallback.
Discover found nothing, or only junk
Look at Known Recovered first. If known objects within the limit were not recovered either, the frames are too few, too short in total span, or not aligned: use more frames, check Alignment, or try Final Synthetic Sweep for faint objects. If you get many junk tracklets, raise Residual Min SNR or Point Detection Threshold, or widen Edge Margin.
A known asteroid shows up as a Potential Discovery
Its predicted position was farther from the real one than the association radius, so the tracklet did not match it. Compare with Known Missed, and see Step 13.
Blink, Discover, or Synthetic Track says to wait for blink preload
CAst is still rendering frames for playback. Wait for the preload to finish, then try again.
Trajectory View opens empty
No known object was selected, or only candidates were. Select a known object and click Trajectory View again, or use Lookup in the empty view.